Nginx and client certificates
TLS server authentication is a very common process these days, thanks to widely adapted HTTPS usage. Here client (e.g. browser) can verify that server’s certificate is trusted and matches the server’s FQDN name.
TLS client authentication is not as commonly seen, but practically the process is just the same verification done otherways around. It doesn’t add any extra layers to TLS encryption, but it allows servers to validate that client connection is coming from a trusted party.
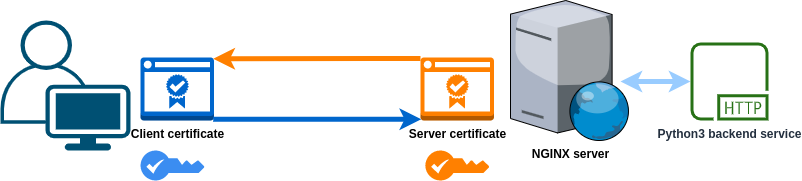
This post demonstrates client certificate usage with Nginx. Exampes will use a simple architecture where Nginx acts as a reverse proxy in front of a backend service.
Technically we are doing mutual authentication1, but I will concentrate more on the client authentication.
Generate test certificate
Here are examples of how to generate self-signed certificates for testing. Copy these certificate(s) and private key(s) to the machine where you will configure the Nginx.
Client certificate
Let’s generate a self-signed client certificate:
openssl req -x509 -newkey rsa:4096 -keyout client1_key.pem -out client1_crt.pem -days 10000 -nodes
This gives us:
client1_crt.pem- client certificateclient1_key.pem- matching private key
We will use this certificate to authenticate with Nginx server.
Server certificate
You can use the same command as with client certificates to generate your server certificate. With a publicly registered domain, you can also use certificate provider like Let’s Encrypt.
Install and configuring Nginx
-
Install Nginx server
# debian/ubuntu sudo apt install nginx # centos sudo yum install nginx # Arch sudo pacman install nginx # etc. - Create a new site file…
/etc/nginx/sites-available/<mysite>… and open the file with your favorite text editor. -
Add the following configuration2 and change the commented parts:
server { listen 443; ssl on; server_name yourdomain.com; # set you domain here server_tokens off; proxy_ssl_server_name on; # SERVER certificate: ssl_certificate /etc/nginx/ssl/fullchain.pem; # SERVER private key: ssl_certificate_key /etc/nginx/ssl/privkey.pem; # Previously generated CLIENT certificate ssl_client_certificate /etc/nginx/clinet/client1_crt.pem; # Require client to present certificate ssl_verify_client on; # Check footnotes for other stuff ssl_protocols TLSv1.2; ssl_ciphers ECDHE-RSA-AES128-GCM-SHA256; ssl_prefer_server_ciphers on; keepalive_timeout 10; ssl_session_timeout 5m; location / { proxy_set_header X-Forwarded-For $proxy_add_x_forwarded_for; proxy_set_header Host $http_host; proxy_redirect off; proxy_set_header X-Forwarded-Proto https; proxy_pass http://localhost:8888; } } - Enable site:
cd /etc/nginx/sites-enabled/ ln -s ../sites-available/<mysite> . -
Restart Nginx:
systemctl restart nginx
Setup Backend Server
Our backend service will be a small Python script that I originally found here. Store the source code somewhere e.g. as server.py
#!/usr/bin/env python3
"""
Very simple HTTP server in python for logging requests
Usage::
    ./server.py [<port>]
"""
from http.server import BaseHTTPRequestHandler, HTTPServer
import logging

class S(BaseHTTPRequestHandler):
    def _set_response(self):
        self.send_response(200)
        self.send_header('Content-type', 'text/html')
        self.end_headers()

    def do_GET(self):
        logging.info("GET request,\nPath: %s\nHeaders:\n%s\n", str(self.path), str(self.headers))
        self._set_response()
        self.wfile.write("GET request for {}".format(self.path).encode('utf-8'))

    def do_POST(self):
        content_length = int(self.headers['Content-Length']) # <--- Gets the size of data
        post_data = self.rfile.read(content_length) # <--- Gets the data itself
        logging.info("POST request,\nPath: %s\nHeaders:\n%s\n\nBody:\n%s\n",
                str(self.path), str(self.headers), post_data.decode('utf-8'))

        self._set_response()
        self.wfile.write("POST request for {}".format(self.path).encode('utf-8'))

def run(server_class=HTTPServer, handler_class=S, port=8080):
    logging.basicConfig(level=logging.INFO)
    server_address = ('', port)
    httpd = server_class(server_address, handler_class)
    logging.info('Starting httpd...\n')
    try:
        httpd.serve_forever()
    except KeyboardInterrupt:
        pass
    httpd.server_close()
    logging.info('Stopping httpd...\n')

if __name__ == '__main__':
    from sys import argv

    if len(argv) == 2:
        run(port=int(argv[1]))
    else:
        run()
Run authentication tests
-
Start the Python server. You can launch it inside a screen session and keep it running:
screen python3 server.py 8888 #detach screen: ctrl+A+D -
Make sure that Nginx is running correctly:
systemctl status nginx -
Now you can test the connection with curl:
curl --key path_to/client1_key.pem --cert path_to/client1_crt.pem https://your.domainYou can specify CA certificate with
--cacert <file>option, in case your server’s certificate isn’t trusted by your machine. -
Check server’s output:
#in case you used screen
screen -r
You should see something like this:
# python3 server.py 8888 INFO:user:Starting httpd... INFO:user:GET request, Path: / Headers: X-Forwarded-For: 127.0.0.1 Host: yourdomain.com X-Forwarded-Proto: https Connection: close User-Agent: curl/7.52.1 Accept: */* 127.0.0.1 - - [16/Apr/2020 10:42:55] "GET / HTTP/1.0" 200 - -
Now test the connection without the client certificate:
curl https://your.domainYou should get a response like this:
<html>
<head><title>400 No required SSL certificate was sent</title></head>
<body bgcolor="white">
<center><h1>400 Bad Request</h1></center>
<center>No required SSL certificate was sent</center>
<hr><center>nginx</center>
</body>
</html>
The chain of trust

In our above example, we generated a self-signed client certificate which was then given directly as a ssl_client_certificate parameter. In a real-life scenario, your client certificates should be signed with your CA’s root certificate or with your CA’s intermediate certificate. With both of these cases, your CA’s root certificate would be set in the ssl_client_certificate parameter.
It’s possible to use certificates signed by a public CA, but usually, you don’t want to do that with client certificates as then unknown parties could request certificates from the same CA and authenticate with your TLS endpoint.
When an intermediate certificate is used to sign client certificates you can bundle client certificates with the intermediate certificate and this way the Nginx server can verify the full certificate chain.
Notice that certificates signed with other intermediate certificates of the same CA, or certificates directly signed with the root certificate, will pass the authentication as well.
Access client certificates’ details
Sometimes it can be enough to accept certificates from a specific CA, but sometimes you may need to validate client certificates more closely.
Nginx’s ngx_http_ssl_module has multiple variables to access certificate details. We will now focus to ssl_client_s_dn variable which includes the value of certificate’s distinguished name (dn). You can see other variables here.
Pass certificate details to backend service
You can pass certificate’s DN string to backend inside a header like this:
location / {
...
   proxy_set_header X-ssl-dn $ssl_client_s_dn;
...
}
#Remember to restart nginx after changes
Now you can try curl again (with client certificate) and our python server should print the certificate’s DN value inside the X-ssl-dn header.
127.0.0.1 - - [16/Apr/2020 11:21:17] "GET / HTTP/1.0" 200 -
INFO:user:GET request,
Path: /
Headers:
X-Forwarded-For: 127.0.0.1
X-ssl-dn: /C=XY/ST=Some-State/O=Internet Widgits Pty Ltd/CN=client.1.local
Host: yourdomain.com
X-Forwarded-Proto: https
Connection: close
User-Agent: curl/7.52.1
Accept: */*


127.0.0.1 - - [16/Apr/2020 11:29:13] "GET / HTTP/1.0" 200 -
Validate access in Nginx
Sometimes you may want to do further validation already on the Nginx server and minimize requests that are forwarded to backend service. Another reason could be that your backend service doesn’t need to be aware of client certificates.
I will show few examples of how you can allow only specific certificates, or certificates from a specific issuer, with Nginx’s configuration.
Allow specific certificates only
We can use if statements in Nginx to allow only few specific certificates. However, read this before you start to play around with if statements.
server{
...
    if ($ssl_client_s_dn !~ "(C=FI/ST=Some-State/O=Internet Widgits Pty Ltd/CN=client.2.local)|(/C=FI/ST=Some-State/O=Internet Widgits Pty Ltd/CN=client.1.local)")
    {
        return 403;
    }

    location / {
...
This approach should only accept certificates that DN string matches with client1 or client2.
Allow only certificates from a specific issuer
Think about a situation where you have an internal CA with multiple intermedia certificates. Those intermediate certificates have been used to issue certificates into all kinds of internal services.
Now imagine you have a new service that should only allow access when the client’s certificate is issued by a specific intermediate certificate. To achieve this kind of restriction I will briefly demonstrate another Nginx variable:
$ssl_client_i_dn returns the “issuer DN” string of the client certificate for an established SSL connection according to RFC 2253 (1.11.6);
– http://nginx.org/en/docs/http/ngx_http_ssl_module.html
The below image demonstrates CA’s structure and validation that we want to achieve.
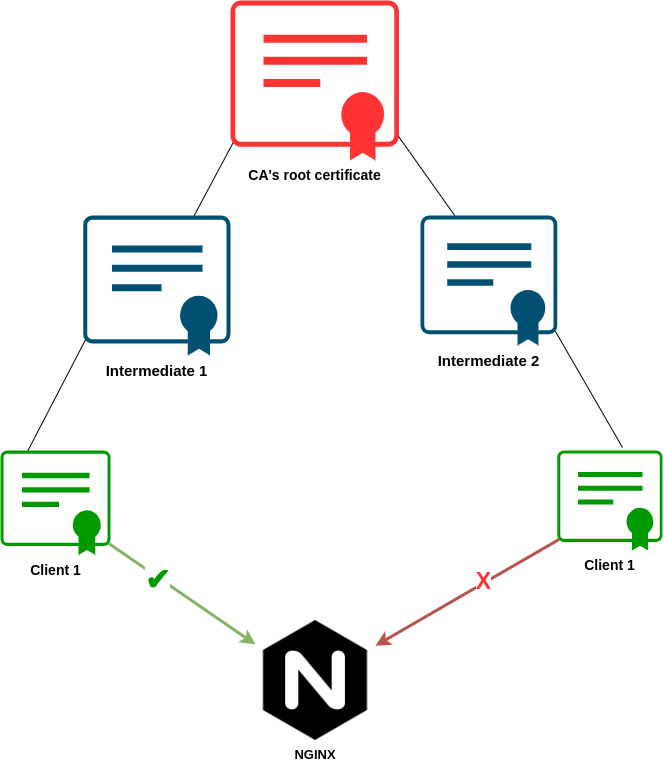
Nginx rule that we can use won’t differ much from validating client’s DN value:
if ($ssl_client_i_dn !~ 'Intermediate 1')
{
   return 403;
}
Now Nginx should forward client request only when certificate is issued by the intermediate certificate Intermediate 1.
Remember those layers
One thing to remember is that you shouldn’t concentrate only on perimeter security.
Here’s a simple illustration of a quite traditional scenario where these services are located, for example, inside an on-premises server room (aka broom closet), and this office has only one big flat network. Consider what potential issues are in the below image. You can imagine that there are other services and bunch of desktop users inside the same perimeter.
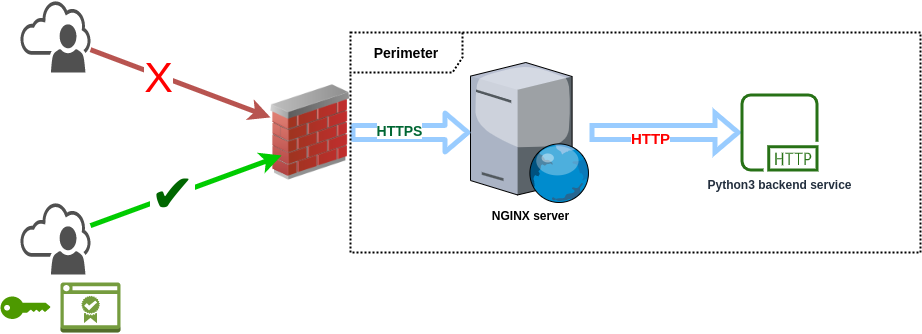
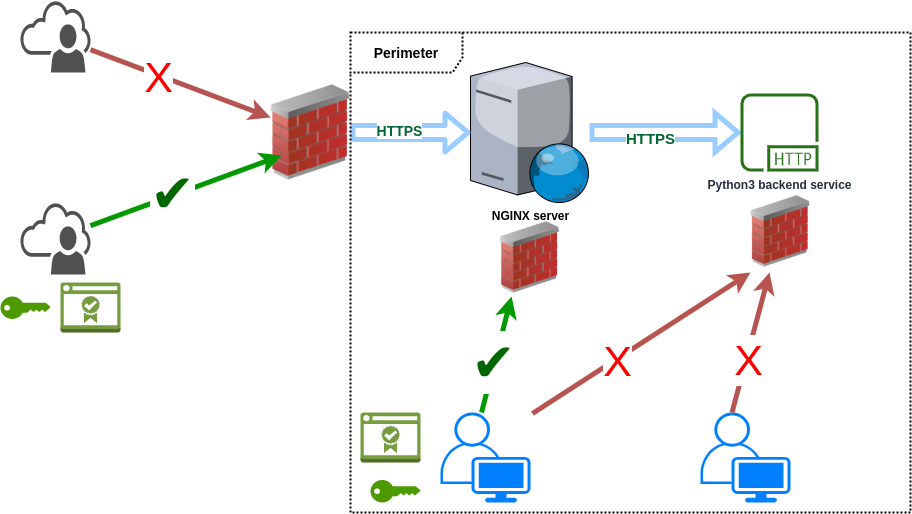
Well, the main issue is that someone behind the perimeter could communicate directly with the backend application and bypass the certificate authentication.
We can demonstrate this with our Python backen service. Let’s modify the code a bit:
    def _set_response(self, ok=False):
        if ok:
            self.send_response(200)
            self.send_header('Content-type', 'text/html')
            self.end_headers()
        else:
            self.send_response(403)
            self.send_header('Content-type', 'text/html')
            self.end_headers()

    def authenticate(self, dn):
        self.trusted_dns = ["/C=FN/ST=Some-State/O=Internet Widgits Pty Ltd/CN=client.1.local"]
        if dn in self.trusted_dns:
            return True
        else:
            return False

    def do_GET(self):
        auth = self.authenticate(self.headers['X-ssl-dn'])
        logging.info("GET request,\nPath: %s\nHeaders:\n%s\n", str(self.path), str(self.headers))
        self._set_response(auth)
        self.wfile.write("GET request for {}".format(self.path).encode('utf-8'))
I only changed the do_GET methods, so let’s forget other HTTP methods that were covered by the code. Now when server gets a GET request:
- It will pass
X-ssl-dnheader’s value toauthenticatemethod. authenticatemethdos checks if the request’s DN value is found fromtrusted_dnslist.- If DN is in
trusted_dnslist, then200 OKis returned. - If DN is not in
trusted_dnslist, then403 forbiddenis returned.
The one string that I added in my trusted_dns list doesn’t match my client certificate’s DN string, so I should get 403response…
$ curl -v --key key.pem --cert cert.pem  https://my.domain
...
< HTTP/1.1 403 Forbidden
< Server: nginx
< Date: Mon, 20 Apr 2020 21:27:34 GMT
< Content-Type: text/html
< Transfer-Encoding: chunked
< Connection: keep-alive
…and I did. Let’s now try connect backend service directly without client certificate or additional headers…
curl -v my.domain:8888
...
>
* HTTP 1.0, assume close after body
< HTTP/1.0 403 Forbidden
< Server: BaseHTTP/0.6 Python/3.5.3
< Date: Mon, 20 Apr 2020 21:34:20 GMT
< Content-type: text/html
…still 403 response. Let’s send yet another request, but now I will specify the X-ssl-dn header directly into the request…
$ curl -v my.domain:8888 -H $'X-ssl-dn: /C=FN/ST=Some-State/O=Internet Widgits Pty Ltd/CN=client.1.local'
>
* HTTP 1.0, assume close after body
< HTTP/1.0 200 OK
< Server: BaseHTTP/0.6 Python/3.5.3
< Date: Mon, 20 Apr 2020 21:37:10 GMT
< Content-type: text/html
…and now we have 200 OK response without need for a client certificate. It’s crucial to remember that certificates should not be considered as secrets because both client and server certificates are sent over the wire unencrypted during the TLS handshake.
The point of these examples was to show, that the correct approach to secure a backend service is to have a solution where the security is on the same level no matter if the user is connecting from an “untrusted” network or from a “trusted” network.
Recap
- TLS client authetication is quick to setup with Nginx…
- …but there are lots of things to consider with overall security.
- Applications still need to validate authentication requests similarly as they would with form-based authentication.
- You can still have form-based authentication with client certificates, so those can be combined for better security.
-
The given example configuration of Nginx may not reflect all TLS related security configurations that are recommended at least in production use. Check Mozillas TLS recommendations and TLS configuration tool for better overall information. ↩