Monitoring Ruuvi tags with Raspberry Pi
This post shows how to deploy Raspberry Pi to fetch Ruuvi tag data and serve that data in a web application. Check this if you don’t know what Ruuvi tag is.
The overall result is:
- A python script to retrieve tag data and store it into an SQLite database.
- The script uses the ruuvitag-sensor Python library to communicate with Ruuvi tags.
- An API to serve the data.
- A Web application that consumes the API and displays the data in an HTML table.
What you need
- At least one Ruuvi tag.
- Raspberry Pi (I’m using model 3)
- If you have an older version without Bluetooth capability, then an external Bluetooth adapter is needed.
Initial setup
Start here if you need help with the initial Raspberry Pi setup. The optimal starting point for this post is that you can SSH into your Pi. I have used the latest Raspbian Lite OS image in the examples of this post.
Install dependencies
First install Python and bluetooth packages.
sudo apt-get install python3-venv python3-pip bluez bluez-hcidump
Then create a Python3 virtual environment and activate it.
python3 -m venv ruuvi
source ruuvi/bin/activate
Next install Python dependencies.
pip3 install ruuvitag_sensor flask flask-bootstrap requests Flask-WTF
Collecting tag data
Save the below script as tag_to_sqlite.py. The script fetches the latest data from a tag and stores that into a database.
#!/usr/bin/python3
from ruuvitag_sensor.ruuvi import RuuviTagSensor
import sqlite3
from sqlite3 import Error
import datetime as dt
import sys
import re

def get_tag_data(mac):
    timeout_in_sec = 20
    datas = RuuviTagSensor.get_data_for_sensors(mac, timeout_in_sec)
    return datas[mac[0]]


def create_connection(db_file):
    """ create a database connection to the SQLite database
        specified by db_file
    :param db_file: database file
    :return: Connection object or None
    """
    conn = None
    try:
        conn = sqlite3.connect(db_file)
        return conn
    except Error as e:
        print(e)

    return conn


def create_table(conn, create_table_sql):
    """ create a table from the create_table_sql statement
    :param conn: Connection object
    :param create_table_sql: a CREATE TABLE statement
    :return:
    """
    try:
        c = conn.cursor()
        c.execute(create_table_sql)
    except Error as e:
        print(e)

def insert_tag_data(conn, data):
    try:
        c = conn.cursor()
        c.execute("INSERT INTO ruuvidata VALUES (null,?,?,?,?,?,?,?,?,?,?,?,?,?,?)", [dt.datetime.now(), data['data_format'], data['humidity'], data['temperature'], data['pressure'], data['acceleration'], data['acceleration_x'], data['acceleration_y'], data['acceleration_z'], data['tx_power'], data['battery'], data['movement_counter'], data['measurement_sequence_number'], data['mac']])
        conn.commit()
    except Error as e:
        print(e)

def main():
    if len(sys.argv) < 2:
        sys.exit("Give mac address as an argument")
    if not re.match(r'(?:[0-9a-fA-F]:?){12}', sys.argv[1]):
        sys.exit("Give mac address as an argument")

    database = "/home/pi/ruuvitag.db"

    sql_create_ruuvidata_table = """ CREATE TABLE IF NOT EXISTS ruuvidata (
                                        id integer PRIMARY KEY,
                                        time timestamp,
                                        data_format integer,
                    humidity real,
                    temperature real,
                    pressure real,
                    acceleration real,
                    acceleration_x integer,
                    acceleration_y integer,
                    acceleration_z integer,
                    tx_power integer,
                    battery integer,
                    movement_counter integer,
                    measurement_sequence_number integer,
                    mac text
                                    ); """

    # create a database connection
    conn = create_connection(database)

    # create tables
    if conn is not None:
        create_table(conn, sql_create_ruuvidata_table)
        insert_tag_data(conn, get_tag_data([sys.argv[1]]))
    else:
        print("Error! cannot create the database connection.")


if __name__ == '__main__':
    main()
Note the line database = "/home/pi/ruuvitag.db" in the main function. If you are not using the default pi user then change this to something else in here.
You can test the script by running chmod 755 tag_to_sqlite.py && ./tag_to_sqlite.py "<your tag's MAC address in format XX:XX:XX:XX:XX:XX>". As a result, the database should exist now and it should have one row populated with the sensor’s data. You can check this with sudo apt install sqlite3 && sqlite3 ruuvitag.db "select * from ruuvidata;".
You can find the MAC address of your Ruuvi tag with the Python library’s command-line tool or with Ruuvi Station mobile apps.
python3 ruuvi/lib/python3.7/site-packages/ruuvitag_sensor -f
Flask API and UI
The Flask web application framework is an excellent choice when you want to get something quickly up and running.
First start by creating the below directory structure under /home/pi/flasktag.
flasktag
├── forms
├── templates
└── util
This is the base folder structure for the API and UI apps.
Deploying the API
Next, create a file flasktag/api.py and add the following content to it. The API is a very simple JSON based API that returns the requested amount of rows from the ruuvitag.db database.
from flask import Flask, jsonify
from util.db import *

app = Flask(__name__)

database = "../ruuvitag.db"

def prepare_data(values, keys):
    data = []
    for row in values:
        current = {}
        for value,key in zip(row, keys):
            current[key] = value
        data.append(current)
    return data

@app.route('/api/<rows>', methods=['GET'])
def ruuvi(rows=None):
    values, keys = get_data(database, rows)
    data = prepare_data(values, keys)
    return jsonify(data)

if __name__ == "__main__":
    app.run(host='127.0.0.1',port=8080)
Once again note the line database = "../ruuvitag.db" and change the path if it doesn’t match with your setup. If you check the code you can see that there is one endpoint /api/<rows> where the rows is amount of database rows you want to retrieve.
Next, create a file flasktag/util/db.py and add the following content to it. This file is a helper script that does the actual database communication.
import sqlite3
from sqlite3 import Error

def create_connection(db_file):
    conn = None
    try:
        conn = sqlite3.connect(db_file)
        return conn
    except Error as e:
        print(e)
    return conn

def get_data_internal(conn, rows):
    try:
        c = conn.cursor()
        c.execute('SELECT * FROM ruuvidata ORDER BY id DESC LIMIT (?)', [int(rows)])
        data = c.fetchall()
        table = list(map(lambda x: x[0], c.description))
        return data,table
    except Error as e:
        print(e)

def get_data(database, rows):
    conn = create_connection(database)
    return get_data_internal(conn, rows)
Testing the API
Navigate to the flasktag folder and run the API app with the command python3 api.py. You can launch this in background or in Screen or in a new ssh session.
Then test the API with curl using the command curl -s http:/127.0.0.1:8080/api/1 | python3 -m json.tool. The command should return one database row in JSON format. The | python3 -m json.tool part is just for pretty printing.
$ curl -s http:/127.0.0.1:8080/api/1 | python3 -m json.tool
[
    {
        "acceleration": 1041.9213022104884,
        "acceleration_x": 20,
        "acceleration_y": -60,
        "acceleration_z": 1040,
        "battery": 3067,
        "data_format": 5,
        "humidity": 26.2,
        "id": 2,
        "mac": "e4c7751d5211",
        "measurement_sequence_number": 5466,
        "movement_counter": 18,
        "pressure": 1009.69,
        "temperature": 20.51,
        "time": "2020-12-18 00:29:06.094224",
        "tx_power": 4
    }
]
Deploying the UI
The UI shows the data inside an HTML table. It uses the API in the background. I did the separation in this way as I may want to use the API or some version of it to populate the data into some existing data visualization tool. The UI is mainly a proof of concept tool to view the data.
Now create the actual app file flasktag/ui.py with the below content:
from flask import Flask, render_template, request
from flask_bootstrap import Bootstrap
from forms.RowForm import RowForm
import requests

app = Flask(__name__)
app.config['SECRET_KEY'] = 'not-so-important-in-this-app'
api = 'http://127.0.0.1:8080/api'
bootstrap = Bootstrap(app)

@app.route('/', methods=['GET', 'POST'])
def ruuviUI():
    form = None
    ruuvidata = None
    if request.method == 'GET':
        form = RowForm()
    else:
        try:
            rows = int(request.form['row'])
            r = requests.get("{}/{}".format(api, rows))
            ruuvidata = r.json()
        except Exception as e:
            print("Error with the submitted row amount: {}".format(repr(e)))
            ruuvidata = None
    return render_template('index.html', ruuvidata=ruuvidata, form=form)

if __name__ == "__main__":
    app.run(host='0.0.0.0',port=8888)
This file includes one view and it has two main functionalities depending on the HTTP method of a request. With the GET method, it returns a form that asks how many database rows the user wants to view. With the POST method, it returns the number of rows that were requested. So, in short, the user gives a number, and the data is shown in an HTML table.
Next create a file flasktag/forms/RowForm.py with the below content. This is a bluepring of the form that requests how many rows of data the user wants to view.
from flask_wtf import FlaskForm
from wtforms import StringField, SubmitField
from wtforms.validators import DataRequired

class RowForm(FlaskForm):
    row = StringField('How many rows to fetch?', [DataRequired()])
    submit = SubmitField('Submit')
Finally, create a file flasktag/templates/index.html with the below content and then everything is ready. This is the only HTML page that the UI has.
{% extends 'bootstrap/base.html' %}


{% block head %}
    {{ super() }}
    <title>{% block title %}{% endblock %} - RuuviTag data</title>
{% endblock %}
{% block navbar %}
    <div class="navbar navbar-inverse" role="navigation">
        <div class="container">
            <div class="navbar-header">
                <button type="button" class="navbar-toggle" data-toggle="collapse" data-target=".navbar-collapse">
                    <span class="sr-only">Navbar</span>
                    <span class="icon-bar"></span>
                    <span class="icon-bar"></span>
                    <span class="icon-bar"></span>
                </button>
                <a class="navbar-brand" href="/">RuuviTag data</a>
            </div>
        </div>
    </div>
{% endblock %}
{% block content %}
{% if form %}
<div class="container">
  <div class="jumbotron">
   <form action="/" method="post">
        {{ form.hidden_tag() }}
        <p>
            {{ form.row.label }}<br>
            {{ form.row(size=22) }}<br>
        <p>{{ form.submit() }}</p>
    </form>
  </div>
</div>
{% else %}
{% if ruuvidata %}
<table class="table">
    <thead>
        <tr>
            <th>TIME</th>
            <th>TEMPERATURE</th>
            <th>HUMIDITY</th>
            <th>MAC</th>
        <tr>
    </thead>
    <tbody>
        {% for row in ruuvidata %}
        <tr>
            <td>{{ row['time'] }}</td>
            <td>{{ row['temperature'] }}</td>
            <td>{{ row['humidity'] }}</td>
            <td>{{ row['mac'] }}</td>
        </tr>
        {% endfor %}
    </tbody>
{% else %}
<p>
Failed to fetch ruuvidata.
</p>
{% endif %}
{% endif %}
{% endblock %}
Testing the UI
Ensure that your current working directory is <path>/flasktag. Then launch the API in background and the UI after that.
python3 api.py &
python3 ui.py
Open your browser and navigate to http://<raspberry IP>:8888/.
You should see this.
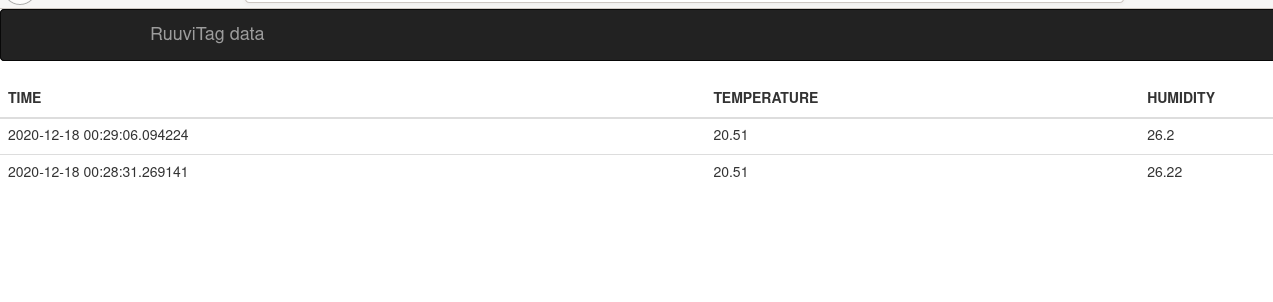
 When you submit the form, then you should see something like this.
Automate data gathering
You can use Cron or Systemd timers to populate the database with new data. I tested this with a simple cron job that launches the tag_to_sqlite.py script every five minutes. Making the virtualenv to work inside the Cron job gave some challenges. I “fixed” this, for now, just by installing the python dependencies globally for the user.
# cron job to populate the data
*/5 * * * * /usr/bin/python3 /home/pi/tag_to_sqlite.py "<tag's MAC address>"